18. Docker
Containers allow a developer to package up an application with all of the parts it needs, such as libraries and other dependencies, and ship it all out as one package. They allow a modular construction of an application, or microservice in short; and being OS agnostic. Docker is a popular tool designed to make it easier to create, deploy, and run applications by using containers. The image is developed using Linux.
Preprocessing scripts and models can be created as a docker image snapshot, and launched as one or multiple containers in production. For models that require to be consistently updated, we need to use volume mapping such that it is not removed when the container stops running.
A connection to read features and output prediction needs to be done. This can be done via a REST API using Flask web server, or through a messenger application like RabbitMQ or Kafka.
18.1. Creating Images
To start of a new project, create a new folder. This should only contain your docker file and related python files.
18.1.1. Dockerfile
from Udemy’s Docker for the Absolute Beginner - Hands On
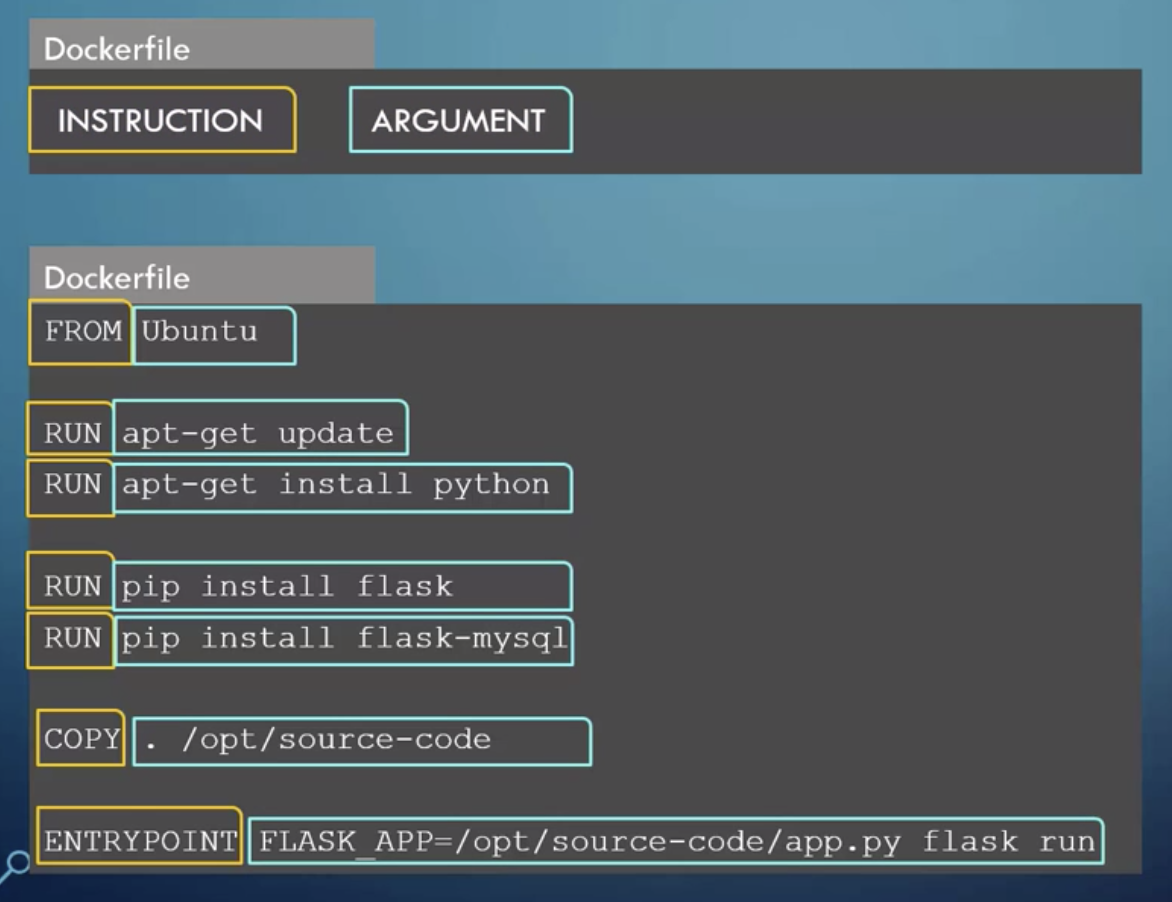
A Dockerfile named as such, is a file without extension type. It contains commands to tell docker what are the steps to do to
create an image. It consists of instructions & arguments.
from Udemy’s Docker for the Absolute Beginner - Hands On
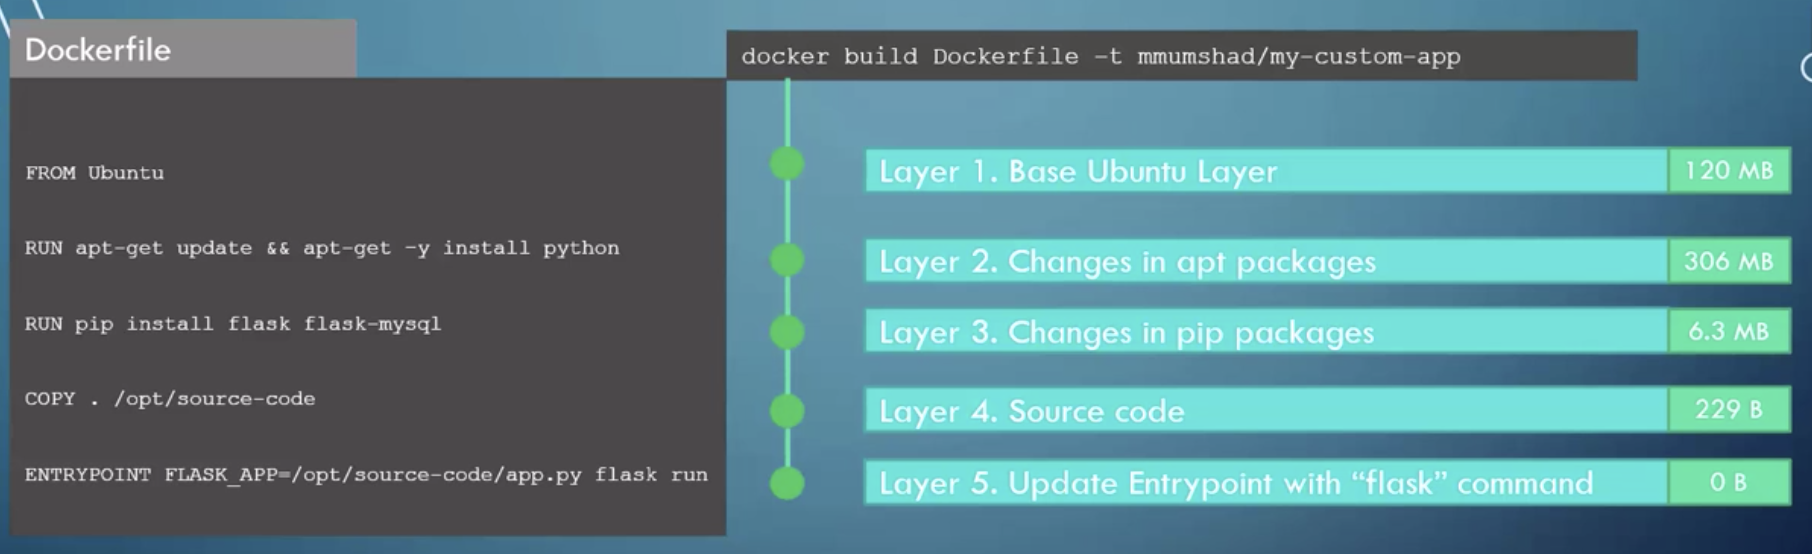
The commands run sequentially when building the image, also known as a layered architecture. Each layer is cached, such that when any layer fails and is fixed, rebuilding it will start from the last built layer. This is why as you see below, we install the python packages first before copying the local files. If any of the local files are changed, there is no need to rebuild the python packages again.
FROMtells Docker which image you base your image on (eg, Python 3 or continuumio/miniconda3).RUNtells Docker which additional commands to execute.CMDtells Docker to execute the command when the image loads.
# download base image
FROM python:3.6

# copy and install libraries
COPY requirements.txt .
# sometimes certain dependency libraries need to be preinstalled
# before it can be run in requirements.txt
RUN pip install Cython==0.29.17 numpy==1.18.1
RUN pip install -r requirements.txt

# copy all local files to docker image
COPY . /app

# terminal will start from this default directory
WORKDIR /app/liftscanner/src

# run the following command when docker is run
# -u so prints in code appear in bash
ENTRYPOINT [ "python", "-u", "app.py" ]
18.1.2. Input Variables
To pass environment variables from docker run to the python code, we can use two methods.
1) Using os.environ.get in python script
import os
ip_address = os.environ.get('webcam_ip')
Then specify in docker run the variable for user input, followed by the image name
# in Dockerfile
CMD python -u main.py

# in bash
docker run -e webcam_ip=192.168.133.1 image_name
2) Using ENTRYPOINT in Dockerfile
# in python script
import sys
webcam_ip = str(sys.argv[1])
# in Dockerfile
ENTRYPOINT [ "python", "-u", "main.py" ]

# in bash
docker run image_name 192.168.133.1
18.1.3. Ignore file
You do not want to compile any files that is not required in the images to keep the size at a minimium.
A file, .dockerignore similar in function and syntax to .gitignore can be used.
It should be placed at the root, together with the Dockerfile.
Below are some standard files/folders to ignore.
# macos
**/.DS_Store
# python cache
**/__pycache__
.git
18.1.4. Build the Image
docker build -t imageName . –(-t = tag the image as) build and name image, “.” as current directory to look for Dockerfile
Note that everytime you rebuild an image with the same name, the previous image will have their image name & tag displayed as <None>.
18.1.5. Push to Dockerhub
Dockerhub is similar to Github whereby it is a repository for your images to be shared with the community. Note that Dockerhub can only allow a single image to be made private for the free account.
docker login –login into dockerhub, before you can push your image to the server
docker push account/image_name –account refers to your dockerhub account name, this tag needs to created during docker build command when building the image
18.2. Docker Compose
In a production environment, a docker compose file can be used to run all separate docker containers
together. It consists of all necessary configurations that a docker run command provides in a yaml file.
So, instead of entering multiple docker run image, we can just run one docker-compose.yml file to start all images.
We also input all the commands like ports, volumes, depends_on, etc.
For Linux, we will need to first install docker compose. https://docs.docker.com/compose/install/. For Mac, it is already preinstalled with docker.
Run docker-compose up command to launch, or docker-compose up -d in detached mode.
If there are some images not built yet, we can add another specification in the docker compose file
e.g., build: /directory_name.
version: '3'
services:
    facedetection:
        build: ./face
        container_name: facedetection
        ports:
            - 5001:5000
        restart: always
    calibration:
        build: ./calibration
        container_name: calibration
        ports:
            - 5001:5000
        restart: always
Below are some useful commands for docker-compose
docker-compose up |
most basic command |
docker-compose up -d |
launch in detached mode |
docker-compose -p PROJECT_NAME up -d |
specify project name instead of taking the directory name |
18.3. Docker Swarm
Docker Swarm allows management of multiple docker containers as clones in a cluster to ensure high availability in case of failure. This is similar to Apache Spark whereby there is a Cluster Manager (Swarm Manager), and worker nodes.
web:
    image: "webapp"
    deploy:
        replicas: 5
database:
    image: "mysql"
Use the command docker stack deploy -c docker_compose.yml to launch the swarm.
18.4. Networking
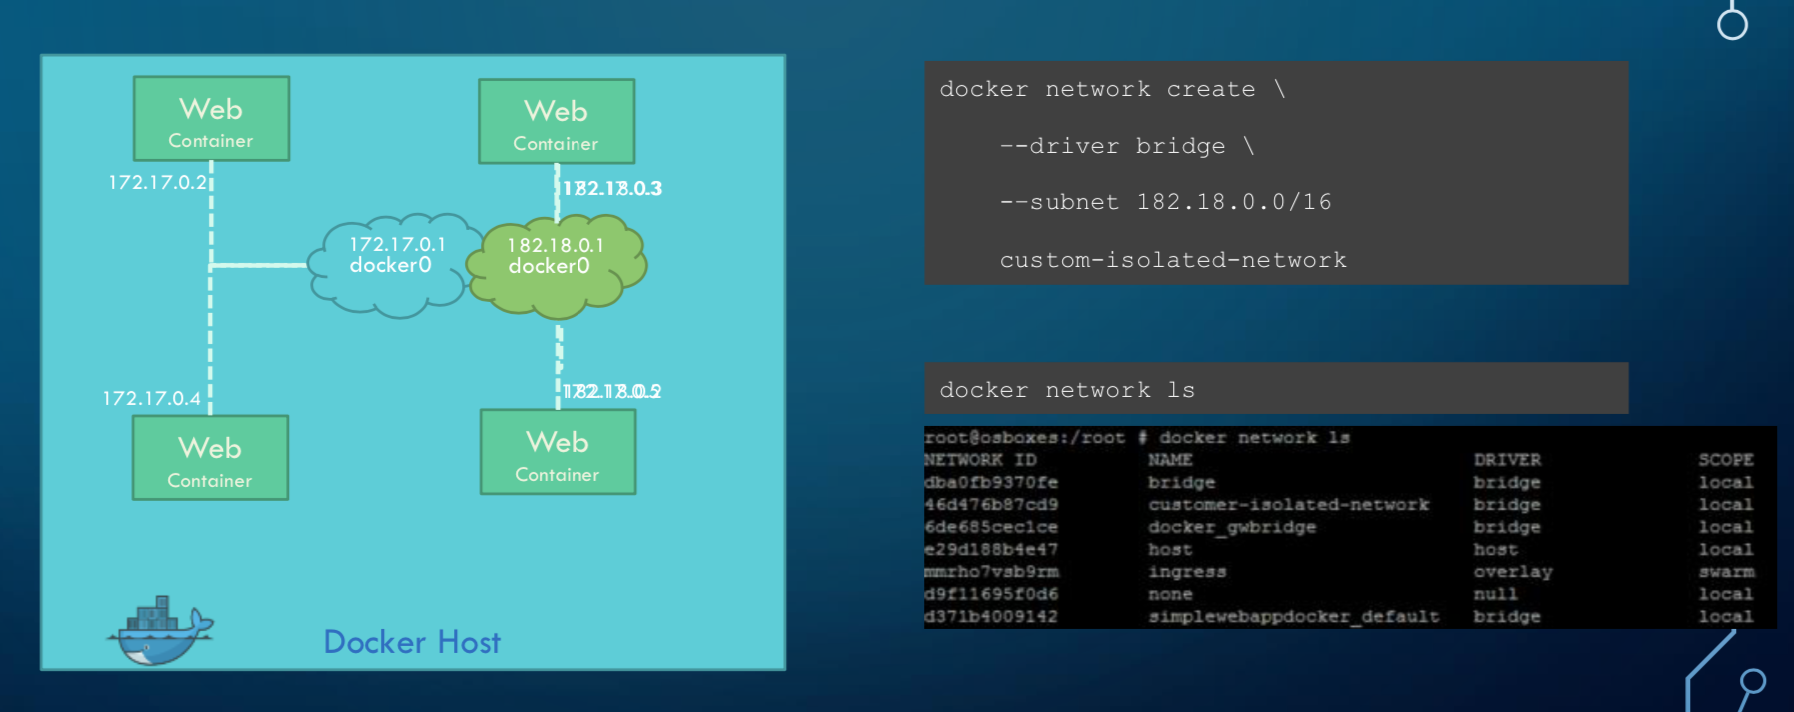
The Bridge Network is a private internal network created by Docker. All containers are attached to this network by default and they get an IP of 172.17.xxx. They are thus able to communicate with each other internally. However, to access these networks from the outside world, we need to
- map ports of these containers to the docker host.
- or associate the containers to the network host, meaning the container use the same port as the host network
from Udemy’s Docker for the Absolute Beginner - Hands On
There will come an instance when we need to communicate between containers. There are three ways to go about it.
First, we can use the docker container IP address. However this is not ideal as the IP can change. To obtain the IP, use docker inspect, and use the IP.
docker inspect container_name
Second, we can use a legacy way by linking containers to each other.
docker run -d --name=container_a image_a
docker run -d --link container_a --name=container_b image_b
The recommended way is to create a network and specify the container to run within that network. Note that the name of the container is also the hostname, while the port is the internal port, not what is
docker network create new_network
docker run -d --network new_network --name=container_a image_a
docker run -d --network new_network --name=container_b image_b
If we need to connect from a docker container to some application running outside in localhost, we
cant use the usual http://localhost. Instead, we need to call using http://host.docker.internal.
18.5. Commands
Help
docker --help |
list all base commands |
docker COMMAND --help |
list all options for a command |
Create Image
docker build -t image_name . |
(-t = tag the image as) build and name image, “.” is the location of the dockerfile |
Get Image from Docker Hub
docker pull image_name |
pull image from dockerhub into docker |
docker run image_name COMMAND |
check if image in docker, if not pull & run image from dockerhub into docker. If no command is given, the container will stop running. |
docker run image_name cat /etc/*release* |
run image and print out the version of image |
Other Run Commands
docker run Ubuntu:17.04 |
semicolon specifies the version (known as tags as listed in Dockerhub), else will pull the latest |
docker run ubuntu vs
docker run mmumshad/ubuntu |
the first is an official image, the 2nd with the “/” is created by the community |
docker run -d image_name |
(-d = detach) docker runs in background, and you can continue typing other commands in the bash. Else need to open another terminal. |
docker run -v /local/storage/folder:/image/data/folder mysql |
(-v = volume mapping) all data will be destroyed if container is stopped |
docker run -p 5000:5000 --restart always comply |
to auto restart container if it crashes |
docker run --name containerName imageName |
give a name to the container |

running docker with a command. each container has a unique container ID, container name, and their base image name
IPs & Ports
192.168.1.14 |
IP address of docker host |
docker inspect container_id |
dump of container info, as well as at the bottom, under Network, the internal IP address. to view server in web browser, enter the ip and the exposed port. eg. 172.17.0.2:8080 |
docker run -p 80:5000 image_name |
(host_port:container_port) map host service port with the container port on docker host |
Also, we can use docker container ls --format "table {{.ID}}\t{{.Names}}\t{{.Ports}}" -a to list all container ports
Networks
docker network ls |
list all networks |
docker network inspect networkname |
display info about this network |
docker network create networkname |
create new network |
docker network rm networkname |
delete network |
See Images & Containers in Docker
docker images |
see all installed docker images |
docker ps |
(ps = process status) show status of images which are running |
docker ps -a |
(-a = all) show status of all images including those that had exited |
docker ps -a --no-trunc |
show all text with no truncations |
docker ps --format '{{.Names}}' |
display only container names |
Remove Intermediate/Stopped Images/Containers
docker image prune |
delete intermediate images tagged as <none> after recreating images from some changes |
docker container prune |
delete stopped containers |
docker system prune |
delete all unused/stopped containers/images/ports/etc. |
View Docker Image Directories
docker run -it image_name sh |
explore directories in a specific image. “exit” to get out of sh |
Start/Stop Containers
docker start container_name |
run container |
docker stop container_name |
stop container from running, but container still lives in the disk |
docker stop container_name1 container_name2 |
stop multiple container from running in a single line |
docker stop container_id |
stop container using the ID. There is no need to type the id in full, just the first few char suffices. |
Remove Containers/Images
docker rm container_name |
remove container from docker |
docker rmi image_name |
(rmi = remove image) from docker. must remove container b4 removing image. |
docker rmi -f image_name |
(-f = force) force remove image even if container is running |
Execute Commands for Containers
docker exec container_nm/id COMMAND |
execute a command within container |
docker exec -it <container name/id> bash |
go into container’s bash |
Inside the docker container, if there is a need to view any files, we have to install an editor first
apt-get update > apt-get install nano. To exit the container exit.
Console Log
Any console prints will be added to the docker log,
and it will grow without a limit, unless you assigned one to it.
The logs are stored in /var/lib/docker/containers/[container-id]/[container-id]-json. log.
docker logs -f container_name |
prints out console log of a container in detached mode |
docker run -d --log-opt max-size=5m --log-opt max-file=10 --name containername imagename |
limit log file size to 5Mb and 10 log files |
Statistics
Sometimes we need to check the CPU or RAM for leakage or utilisation rates.
docker stats |
check memory, CPU utilisations for all containers. Add container name to be specific |
docker -p 5000:5000 --memory 1000M --cpus="2.0" |
assign a limit of 1GB to RAM. It will force the container to release the memory without causing memory error |
18.6. Small Efficient Images
Docker images can get ridiculously large if you do not manage it properly. Luckily, there are various easy ways to go about this.
1. Build a Proper Requirements.txt
Using the pipreqs library, it will scan through your scripts and generate a clean requirements.txt,
without any dependent or redundant libraries. Some manual intervention is needed if, the library
is not installed from pip, but from external links, or the library does not auto install dependencies.
2. Use Alpine or Slim Python
The base python image, example, RUN python:3.7 is a whooping ~900Mb.
Using the Alpine Linux version Run python:3.7-alpine, only takes up about 100Mb.
However, some libraries might face errors during installation for this light-weight version.
Alternatively, using the Slim version RUN python:3.7-slim takes about 500Mb,
which is a middle ground between alpine and the base version.
3. Install Libraries First
A logical sequential way of writing a Dockerfile is to copy all files, and then install the libraries.
FROM python:3.7-alpine
COPY . /app
WORKDIR /app
RUN pip install -r requirements.txt
CMD ["gunicorn", "-w 4", "main:app"]
However, a more efficient way is to utilise layer caching, i.e., installing libraries from requirements.txt before copying the files over. This is because we will more then likely change our codes more frequently than update our libraries. Given that installation of libraries takes much longer too, putting the installation first allows the next update of files to skip this step.
FROM python:3.7-alpine
COPY requirements.txt .
RUN pip install -r requirements.txt
COPY . /app
WORKDIR /app
CMD ["gunicorn", "-w 4", "main:app"]
4. Multi-Stage Builds
Lastly, we can also use what we called multi-stage builds. During the pip installation, cache of libraries are stored elsewhere and the resulting library is bigger then what it should have been.
What we can do is to copy the dependencies after building it, and paste it into a new base python platform.
   FROM python:3.7-slim as base

   COPY requirements.txt .
   RUN pip install -r requirements.txt


   FROM python:3.7-slim

   RUN apt-get update && apt-get -y install libgtk2.0-dev
   COPY --from=base /usr/local/lib/python3.7/site-packages /usr/local/lib/python3.7/site-packages

   COPY . .
   WORKDIR /app


   ENTRYPOINT [ "python", "-u", "app.py" ]


* https://blog.realkinetic.com/building-minimal-docker-containers-for-python-applications-37d0272c52f3
* https://www.docker.com/blog/containerized-python-development-part-1/
* https://medium.com/swlh/alpine-slim-stretch-buster-jessie-bullseye-bookworm-what-are-the-differences-in-docker-62171ed4531d